
The aroma of something delicious wafts through the kitchen as the sun begins to set, and that’s when I feel the urge for a sweet treat that won’t derail my healthy eating. Enter my No-Bake Greek Yogurt Peanut Butter Bars—these quick and easy snacks are not only a satisfying way to curb a craving but also a fantastic option for anyone looking for a wholesome dessert. With creamy Greek yogurt blended with rich peanut butter, they offer a perfect balance of taste and nutrition. Plus, they come together in simple steps without the need to turn on the oven, making them a true hero for busy days. Whether you need a nutritious breakfast, a post-workout pick-me-up, or just a little something sweet, these bars are sure to please. Are you ready to whip up a batch and indulge guilt-free?
Why are these bars a must-try?
Quick and Easy: The no-bake method means you can whip these up in minutes, making them perfect for busy days.
Creamy Delight: Combining Greek yogurt and peanut butter results in a luscious, healthy snack that melts in your mouth.
Guilt-Free Indulgence: With natural sweeteners like honey or maple syrup, satisfy your sweet tooth without the guilt.
Customizable: Mix in mini chocolate chips, or swap peanut butter for almond butter, allowing you to create your favorite flavors. If you enjoy energy bites, check out these delicious Oatmeal Peanut Butter options!
Crowd-Pleaser: Perfect for kids and adults alike, these bars make a delightful and nutritious treat for everyone.
Meal Prep Friendly: Store leftovers in the fridge or freezer for a convenient snack that’s always on hand.
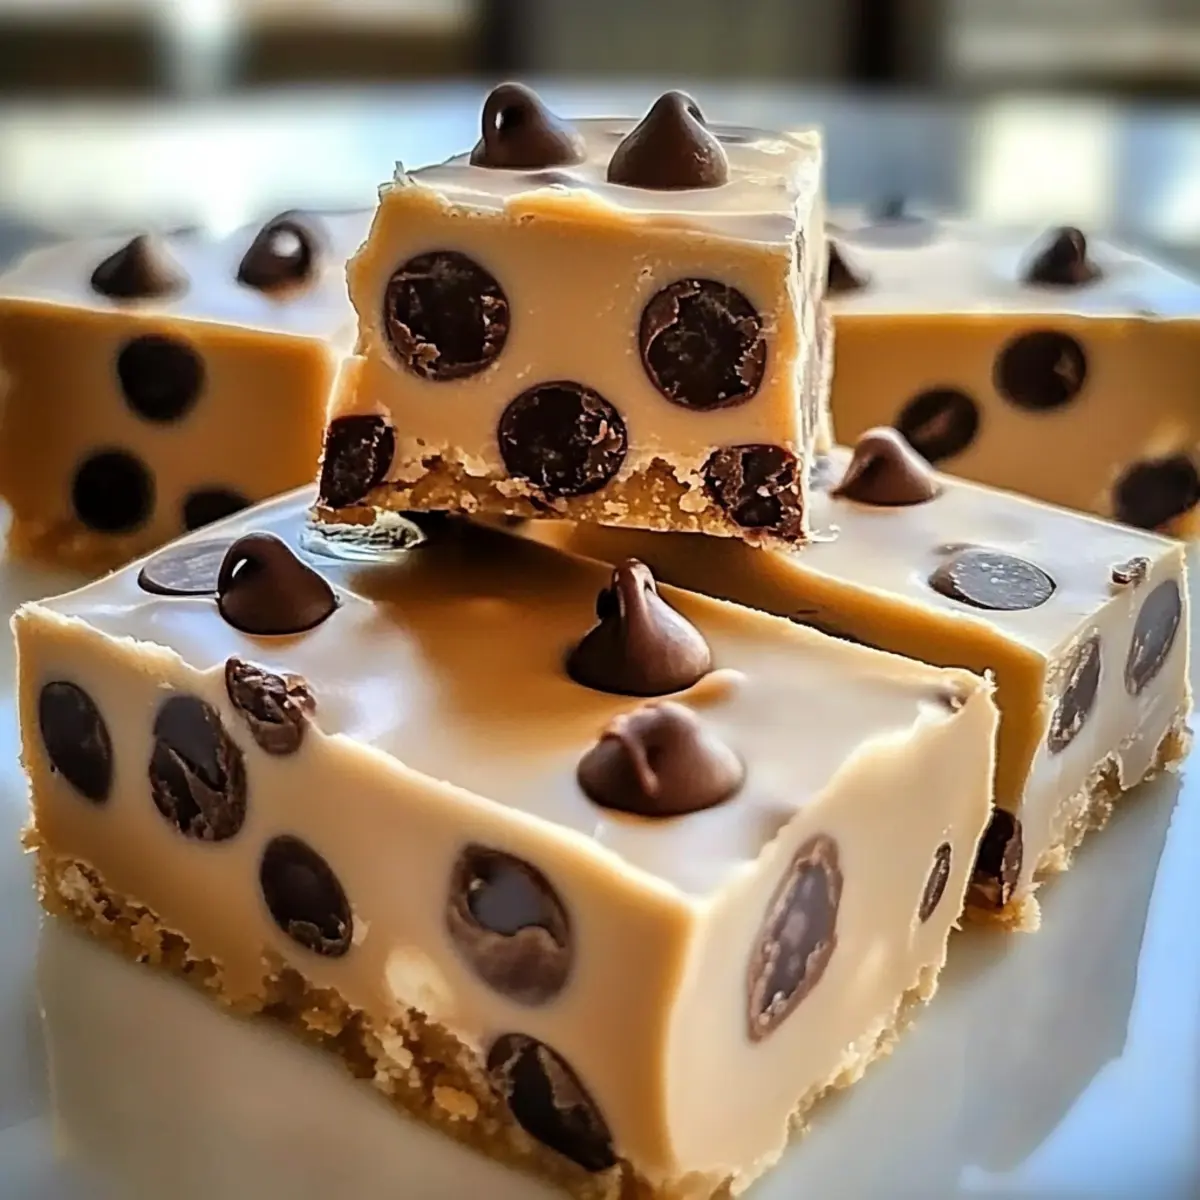
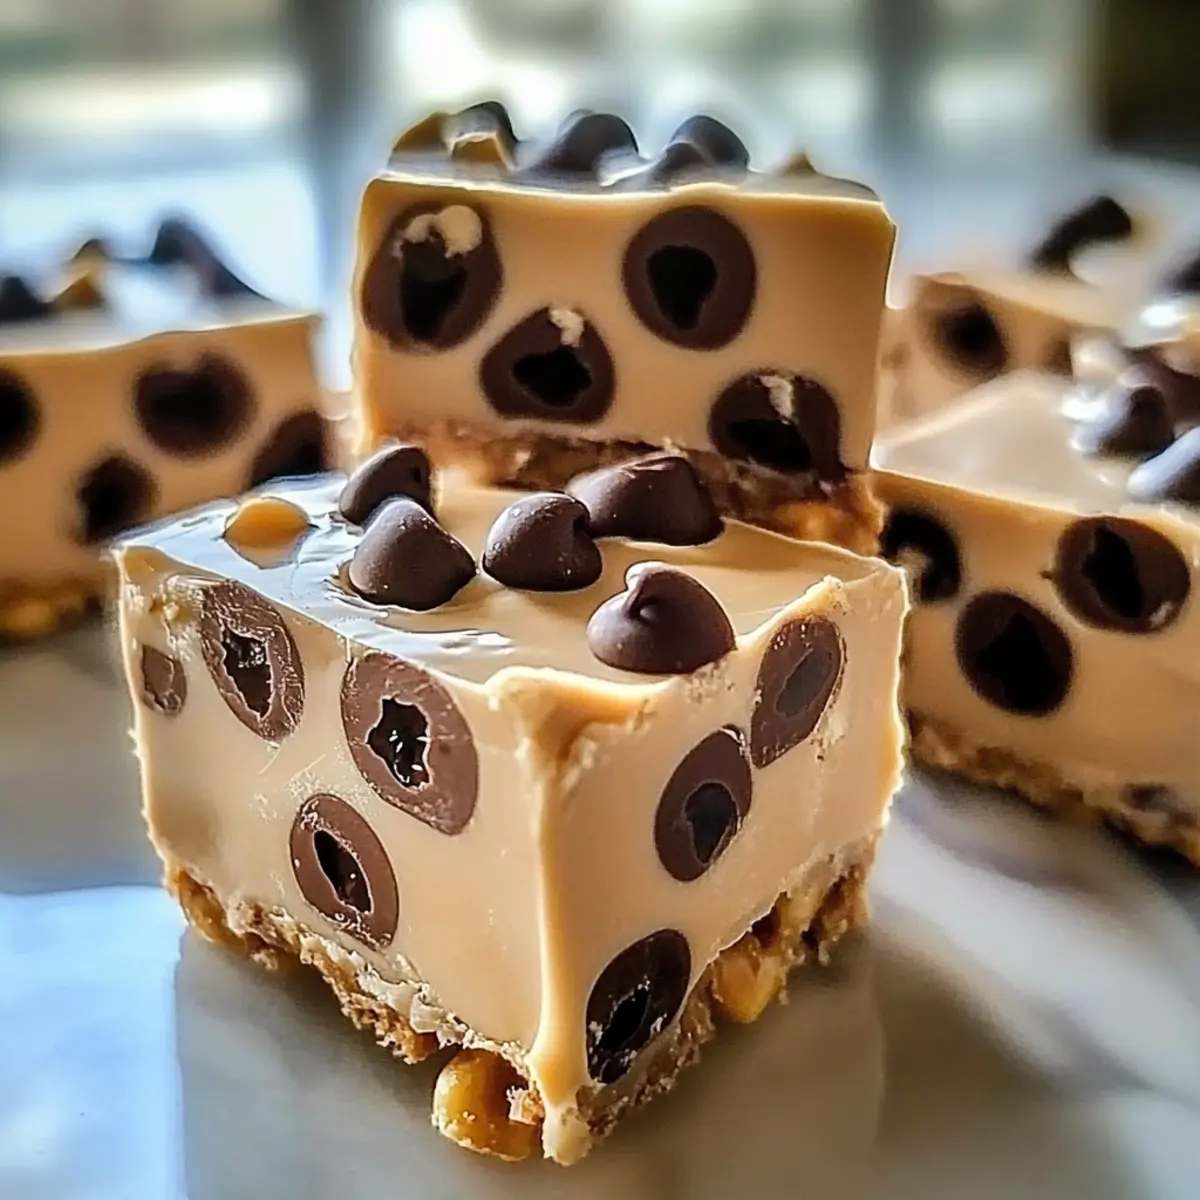
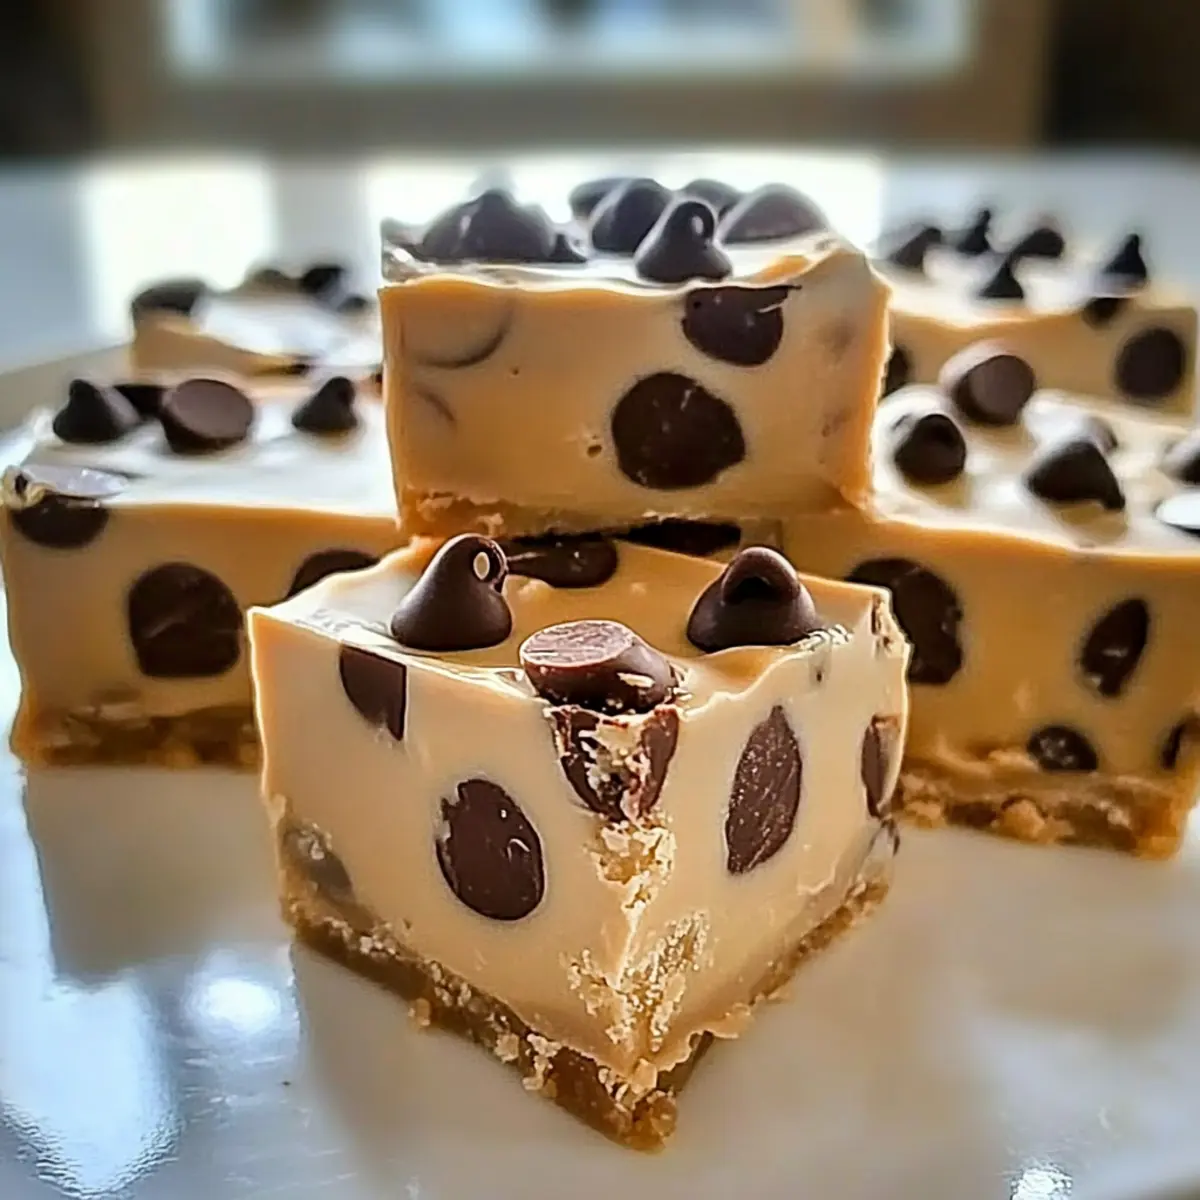
Peanut Butter Frozen Yogurt Bars
• Make these delightful bars today!
For the Base
- Greek yogurt – Provides creaminess and a tangy flavor profile; full-fat offers the best texture.
- Peanut butter – Adds richness and acts as a binder; swap with almond or cashew butter for a nut-free version.
- Honey or maple syrup – Natural sweeteners that enhance flavor; adjust to your desired sweetness level.
- Vanilla extract – Adds depth and aroma; always opt for pure vanilla for optimal flavor.
For the Crunch
- Mini chocolate chips – Optional for added sweetness and texture; dark chocolate chips make a healthier option.
- Chopped peanuts – Optional for extra crunch; can be left out for a nut-free treat.
Experience these Peanut Butter Frozen Yogurt Bars as a quick, satisfying snack or healthy dessert!
Step‑by‑Step Instructions for Peanut Butter Frozen Yogurt Bars
Step 1: Mix the Base
In a large mixing bowl, add 2 cups of Greek yogurt, 1 cup of peanut butter, ¼ cup of honey or maple syrup, and 1 teaspoon of vanilla extract. Use a spatula or electric mixer to combine the ingredients until the mixture is smooth and creamy, with no lumps. This should take about 3-5 minutes, resulting in a thick, velvety base for your Peanut Butter Frozen Yogurt Bars.
Step 2: Incorporate Crunchy Add-Ins
If desired, fold in ½ cup of mini chocolate chips and ¼ cup of chopped peanuts into the mixture. Use a spatula to gently combine, ensuring the chocolate chips and peanuts are evenly distributed throughout the yogurt mixture. This step adds texture and flavor, making your bars even more delightful and satisfying.
Step 3: Prepare the Baking Pan
Line a 9×9-inch baking pan with parchment paper, leaving some overhang for easy removal later. Spread the yogurt and peanut butter mixture evenly into the lined pan using a spatula. Smooth the top until it is level, creating a uniform surface to ensure each bar is the same size once frozen.
Step 4: Chill the Mixture
Place the prepared pan in the refrigerator and let the mixture chill for at least 4 hours, or until it is firm to the touch. This chilling time is essential for the Peanut Butter Frozen Yogurt Bars to set properly. Once the mixture feels solid, you’re ready to cut your bars.
Step 5: Cut and Serve
After the bars have set, remove the pan from the refrigerator and lift the bars out using the parchment paper overhang. Place the bars on a cutting board and slice them into squares or rectangles, depending on your preference. Allow them to sit at room temperature for a few minutes before serving for the best texture. Enjoy your homemade Peanut Butter Frozen Yogurt Bars!
Expert Tips for Peanut Butter Frozen Yogurt Bars
- Achieve Smoothness: Make sure to thoroughly mix the Greek yogurt and peanut butter until completely smooth to avoid lumps that disrupt texture.
- Proper Chilling: Allow the bars to chill in the refrigerator for at least 4 hours; this helps them set properly and hold their shape.
- Even Distribution: Spread the mixture evenly in your pan to ensure all bars are uniform in size and texture once cut.
- Serving Recommendation: Let the bars sit at room temperature for a few minutes before serving for an irresistibly creamy experience.
- Storage Secrets: Keep the Peanut Butter Frozen Yogurt Bars in an airtight container in the fridge for up to a week, or freeze them individually for quick snacks.
What to Serve with No-Bake Greek Yogurt Peanut Butter Bars
Complement these creamy delights with perfectly paired sides that elevate your snacking experience.
- Fresh Fruit Salad: A colorful mix of berries and melons adds a refreshing sweetness that balances the rich peanut butter. Enjoy the burst of fruity flavors that complement each creamy bite.
- Crunchy Granola: Serve alongside for a delightful crunch, offering an added texture contrast against the smooth bars. The nutty undertones of granola make it an irresistible combination.
- Creamy Smoothies: Blend up a berry or banana smoothie for a delicious drink that’s both refreshing and nutritious. The creamy connection between the smoothie and bars enhances your snacking experience.
- Dark Chocolate Drizzle: Drizzle melted dark chocolate over the bars for a chic twist that enhances their sweetness without overshadowing the yogurt’s tang. It creates an elegant finish that feels indulgent.
- Nutty Trail Mix: A mix of nuts, seeds, and dried fruits can provide delightful crunch and varied flavors, offering a hearty companion to your bars. This ensures your snack session is both fun and filling.
- Iced Coffee or Herbal Tea: Pair these bars with a chilled beverage like iced coffee for energy or a calming herbal tea for a relaxing treat. Both options set the perfect atmosphere for indulgence.
- Cheese Platter: Add a few slices of mild cheese to balance out the sweetness with savory notes. The creaminess of the cheese pairs well with the peanut butter, creating a well-rounded snack.
- Chocolate Protein Balls: For a protein-packed double treat, serve with these energy bites. The combination enhances satisfaction, perfect for post-workout cravings or afternoon indulgence.
- Greek Yogurt Dip: Serve a smaller cup of Greek yogurt garnished with honey or spices on the side. It echoes the main ingredient while keeping the focus on deliciousness and health.
- Frozen Berries or Bananas: Enjoy these bars alongside a bowl of frozen berries or sliced bananas for a cool and satisfying contrast, especially on a warm day. This natural sweetness rounds out your snack perfectly.
Peanut Butter Frozen Yogurt Bars Variations
Feel free to get creative with your bars and elevate their deliciousness in delightful ways!
-
Nut-Free: Swap peanut butter for sunflower seed butter for a nut-free version that’s equally tasty.
-
Sweetness Tweaks: Replace honey or maple syrup with agave syrup for a different sweetener and flavor.
-
Fruity Twist: Incorporate ½ cup of dried fruit like cranberries or apricots for extra sweetness and chewiness. Add them for an unexpected yet delicious burst of flavor and texture.
-
Extra Protein: Mix in a scoop of your favorite protein powder for an additional nutritional boost, perfect for those post-workout cravings.
-
Cocoa Delight: Add 2 tablespoons of unsweetened cocoa powder to the base for chocolatey bars that bring a whole new dimension to your snack.
-
Vanilla Variations: Experiment with flavored Greek yogurt, like vanilla or coconut, to give the bars a unique twist; they’ll come out even creamier!
-
Chunky Texture: For a crunchier bite, use crunchy peanut butter instead of creamy—or a combination of both—for the best of both worlds.
If you’re loving the idea of quick snacks, you might also want to try these delectable Oatmeal Peanut Butter options or a refreshing bite of Garlic Butter Tofu. Your taste buds will thank you!
Make Ahead Options
These Peanut Butter Frozen Yogurt Bars are ideal for meal prepping, making them a perfect choice for busy weeknights! You can prepare the yogurt and peanut butter mixture up to 24 hours in advance and refrigerate it before chilling. Simply mix together your Greek yogurt, peanut butter, sweetener, and vanilla, then store it in an airtight container. When you’re ready to serve, just spread the mixture into a lined pan and let it chill for at least 4 hours until set. To maintain freshness, keep the bars stored in the refrigerator for up to 1 week or freeze them for easy, grab-and-go snacks later. Enjoy your delicious bars with minimal effort!
How to Store and Freeze Peanut Butter Frozen Yogurt Bars
- Fridge: Store your Peanut Butter Frozen Yogurt Bars in an airtight container to keep them fresh for up to 1 week. This makes them a convenient grab-and-go snack anytime.
- Freezer: For longer storage, wrap the bars individually in plastic wrap or foil and place them in a freezer-safe container. They can be frozen for up to 1 month without losing flavor.
- Thawing: When you’re ready to enjoy a frozen bar, simply remove it from the freezer and let it sit at room temperature for about 10-15 minutes. This step enhances the creamy texture and makes them easier to bite into.
- Reheating: While these bars are best enjoyed chilled, you can gently microwave them for 10 seconds if you prefer a softer texture. Enjoy your tasty treat!

Peanut Butter Frozen Yogurt Bars Recipe FAQs
What type of Greek yogurt should I use?
I recommend using full-fat Greek yogurt for the best creaminess and texture. However, if you’re looking for lower fat options, low-fat Greek yogurt will work too. Just keep in mind that the bars may be slightly less rich if you choose non-fat yogurt.
How should I store the Peanut Butter Frozen Yogurt Bars?
Store your Peanut Butter Frozen Yogurt Bars in an airtight container in the refrigerator for up to 1 week. For longer storage, wrap them individually in plastic wrap or foil and place them in a freezer-safe container. They can be frozen for up to 1 month while maintaining their flavor!
Can I freeze these bars? How?
Absolutely! To freeze your Peanut Butter Frozen Yogurt Bars, first, ensure they’re fully set and cut into squares or rectangles. Wrap each bar individually in plastic wrap or foil. Then, place them in a freezer-safe container. When you’re ready to enjoy one, just let it sit at room temperature for about 10-15 minutes to soften slightly before diving in.
What can I do if my mixture ends up too runny?
If your mixture is too runny, it might be due to overmixing or using too much liquid sweetener. To fix this, try adding more Greek yogurt a few tablespoons at a time until you achieve a thicker consistency. Ensure everything is well combined but don’t overmix, which can change the texture.
Are these bars safe for people with nut allergies?
For those with nut allergies, I suggest substituting peanut butter with sunflower seed butter or soy nut butter. Both options provide a similar creaminess and texture without any nuts. Always check all ingredient labels to ensure they are nut-free and safe.
How can I customize the sweetness of the bars?
You can easily adjust the sweetness of your Peanut Butter Frozen Yogurt Bars by varying the amount of honey or maple syrup you use. Start with the suggested ¼ cup and taste the mixture before pouring it into the pan. If you desire a sweeter treat, gradually add another tablespoon or two of your chosen sweetener until you reach your preferred flavor!
Delicious Peanut Butter Frozen Yogurt Bars You’ll Love
Ingredients
Equipment
Method
- In a large mixing bowl, mix the Greek yogurt, peanut butter, honey or maple syrup, and vanilla extract until smooth and creamy, about 3-5 minutes.
- Fold in mini chocolate chips and chopped peanuts if desired, ensuring even distribution.
- Line a 9x9-inch baking pan with parchment paper and spread the mixture evenly into the pan.
- Place the pan in the refrigerator for at least 4 hours, or until firm.
- Once set, lift the bars out using the parchment paper and cut them into squares or rectangles.
Leave a Reply