
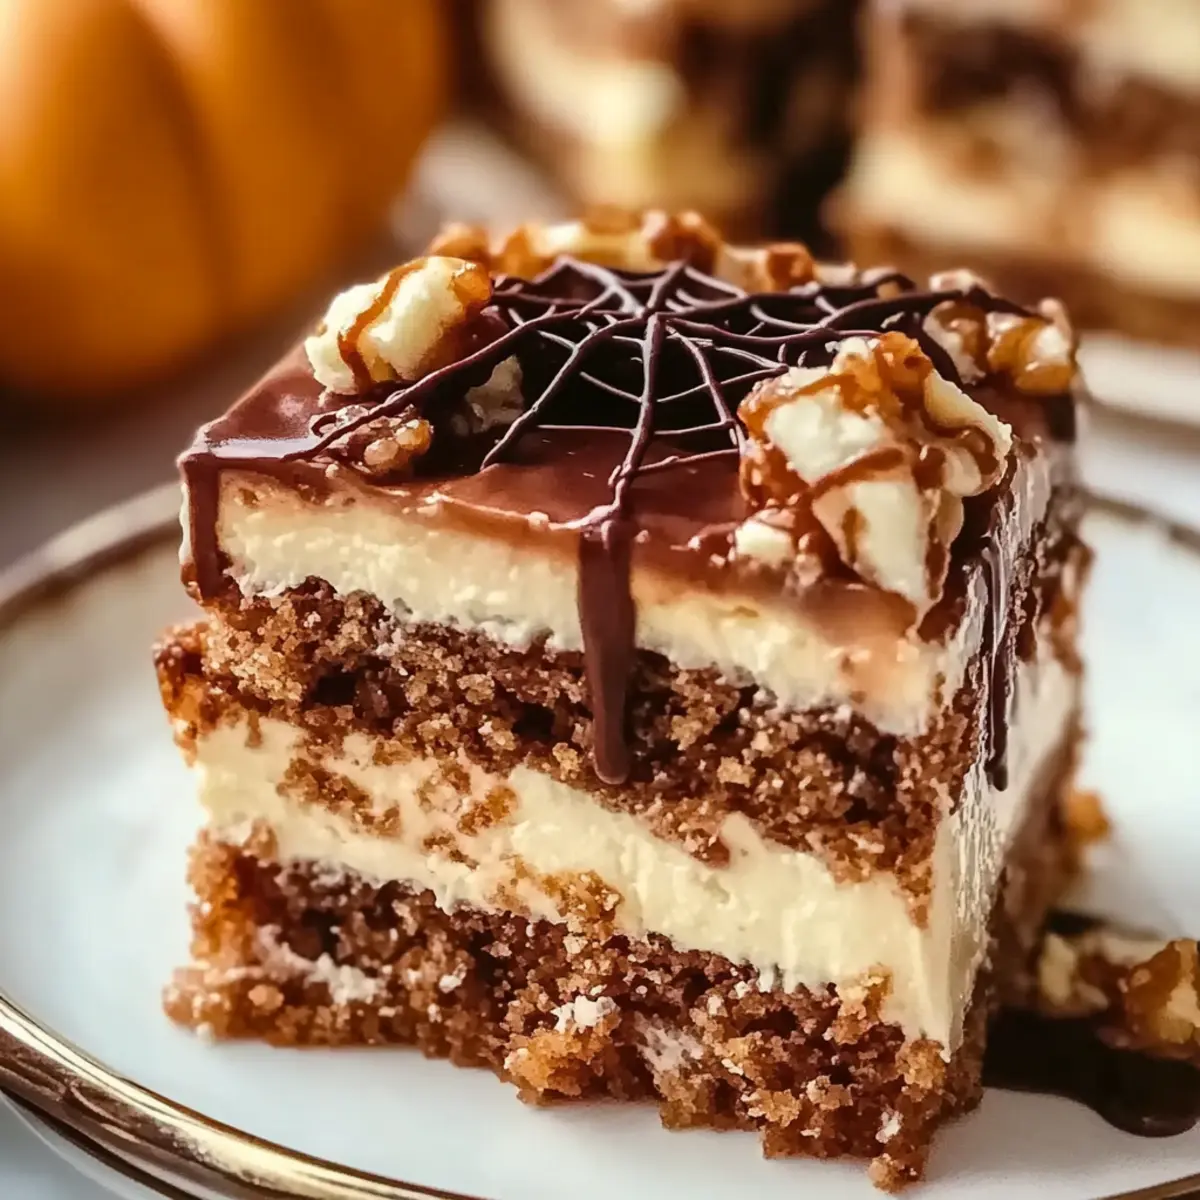
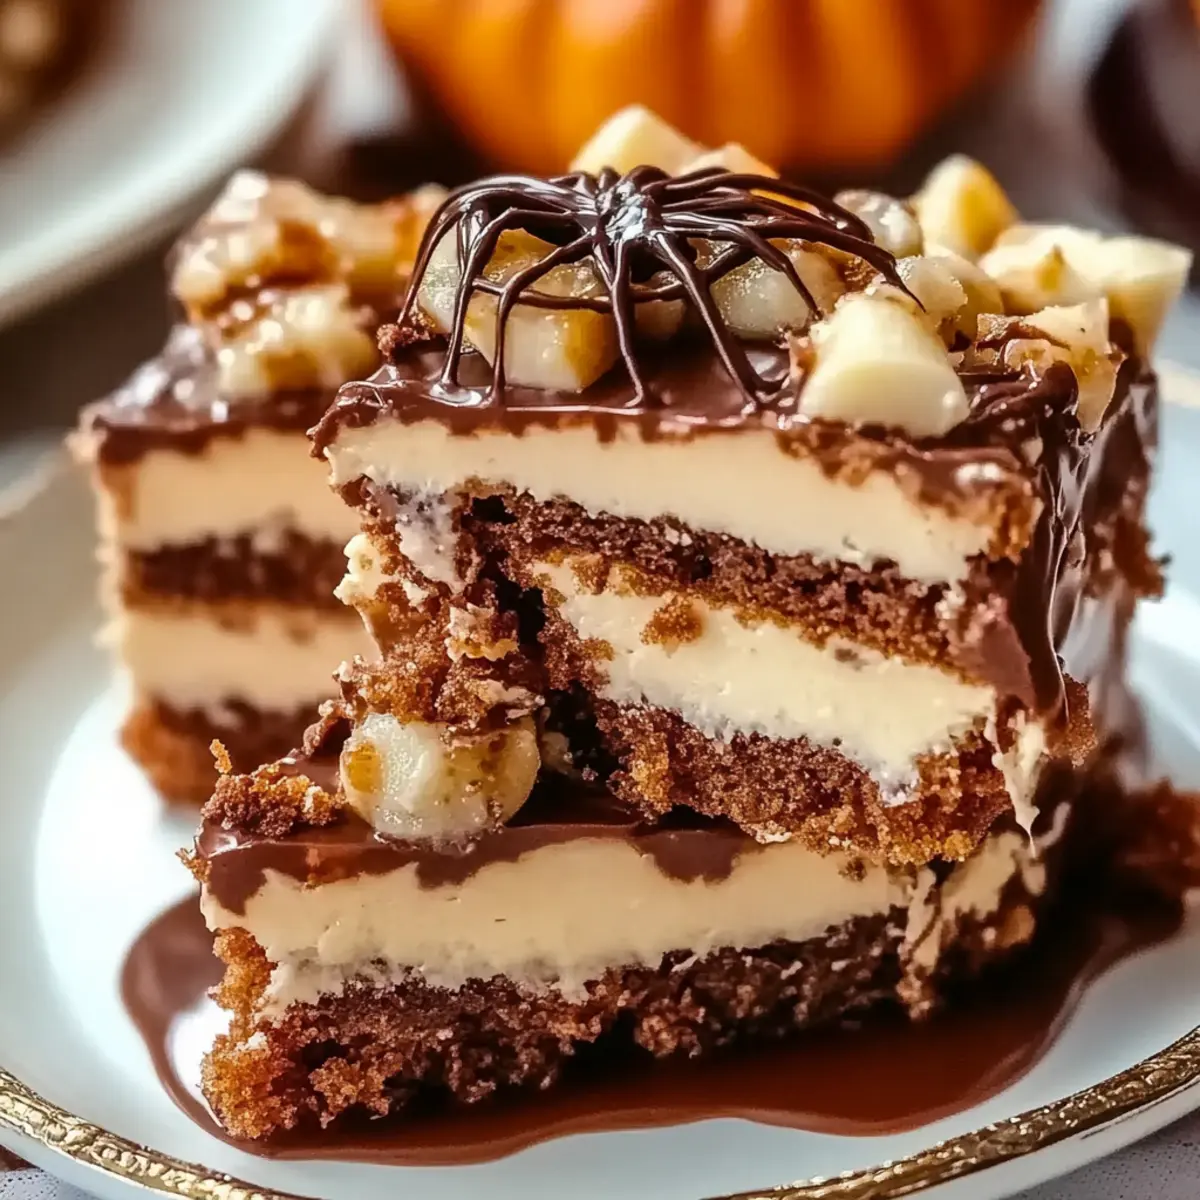
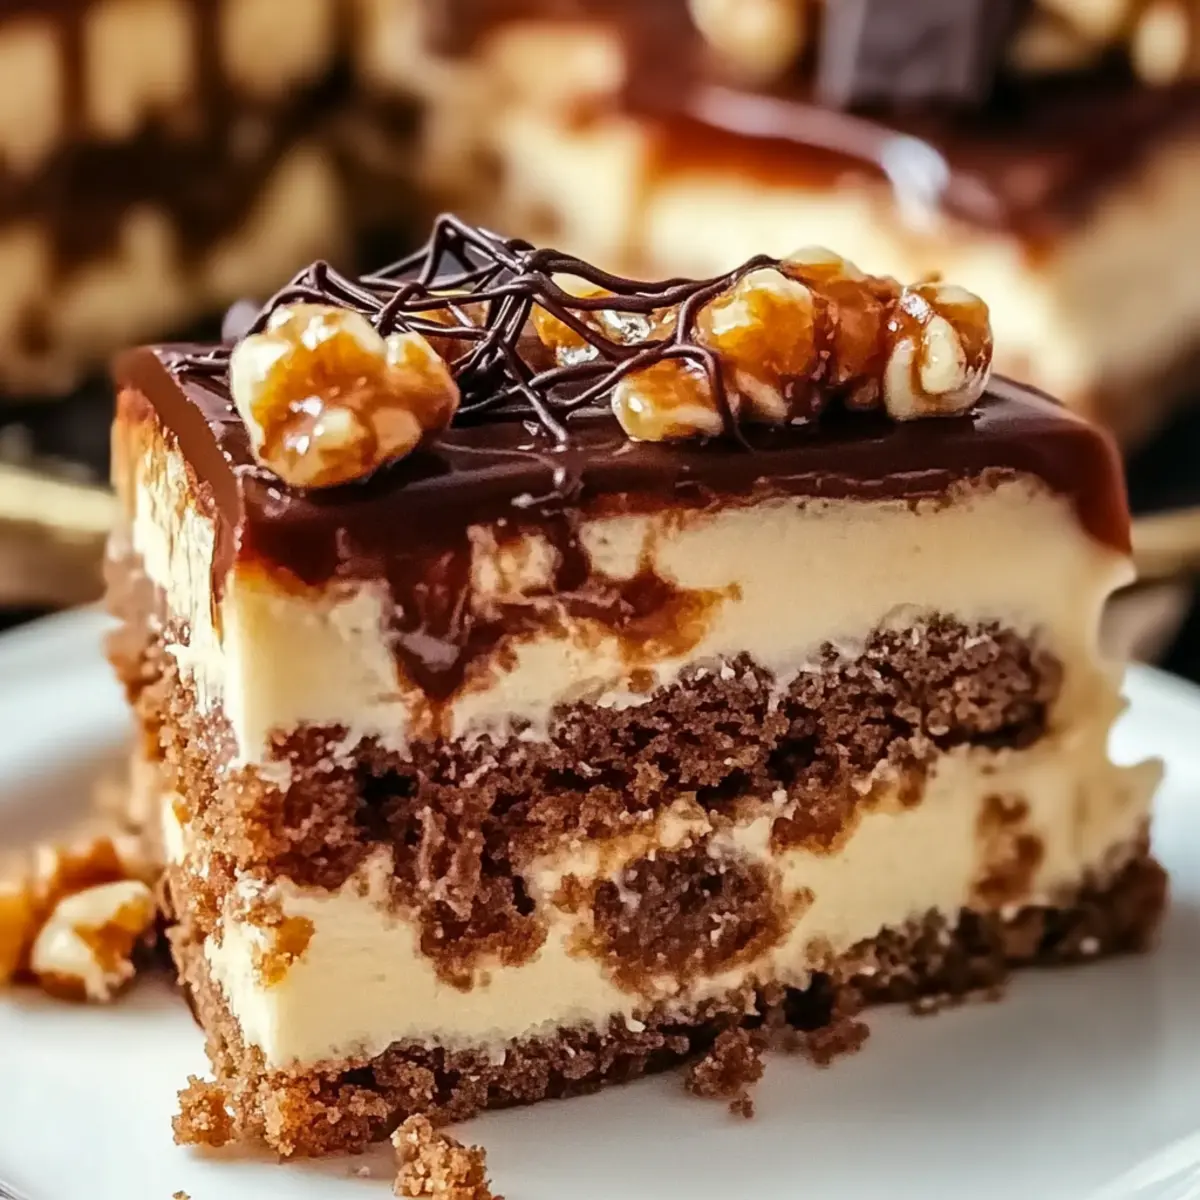
With Halloween just around the corner, the air is rich with the promise of treats that combine spooky fun and sweet delight. My Festive Spiderweb Chocolate Cake is not just a dessert; it’s a showstopper that will elevate your Halloween celebrations. Crafted with a moist, rich chocolate base and topped with an intricate spiderweb design, this cake captures the essence of the season in every slice. One bite reveals the beautiful interplay of textures, offering a chocolatey indulgence that’s sure to please both kids and adults alike. What’s more, this cake is quick to prepare and will impress your guests with its festive charm. Have you ever thought about how much joy a slice of cake can bring to a celebration? Let’s dive into the details and make this enchanting dessert together!
Why Is This Cake So Special?
Irresistible Charm: This Spiderweb Chocolate Cake not only tastes fabulous but looks stunning, making it the centerpiece of any Halloween gathering.
Decadent Layers: The moist, rich chocolate flavor paired with the visual thrill of the spiderweb design creates a delectable experience.
Simple Preparation: With easy-to-follow steps, you don’t need to be a master baker to impress your friends and family.
Versatile Decorating: Feel free to experiment! Alternate between different chocolates or add spooky sprinkles, much like with my Caramel Apple Cheesecake Bars for added fun.
Crowd-Pleasing Delight: Whether it’s a seasonal celebration or a casual get-together, this cake will appeal to both kids and adults alike, making it a guaranteed hit!
Spiderweb Chocolate Cake Ingredients
For the Cake
- All-Purpose Flour – Provides structure; feel free to use cake flour for a lighter texture.
- Unsweetened Cocoa Powder – Delivers deep chocolate flavor; opt for Dutch-process cocoa for extra richness.
- Granulated Sugar – Adds sweetness; brown sugar can deepen the flavor but may slightly change the texture.
- Baking Powder & Baking Soda – Essential leavening agents; always check freshness for the best rise.
- Salt – Enhances flavors; using sea salt adds a delightful crunch.
- Eggs – Bind and moisten the cake; flax eggs can be a vegan alternative.
- Buttermilk – Contributes acidity for tenderness; substitute with milk plus vinegar or lemon juice.
- Vegetable Oil – Keeps the cake moist and rich; melted butter is a good alternative.
- Vanilla Extract – Infuses aromatic flavor; almond extract can add a unique twist.
For the Spiderweb Decoration
- Dark Chocolate – Used for the intricate web design; white chocolate can also create a beautiful contrast for festive appeal.
Elevate your holiday gatherings with this delightful Spiderweb Chocolate Cake, sure to charm both young ghouls and seasoned goblins alike!
Step‑by‑Step Instructions for Spiderweb Chocolate Cake
Step 1: Preheat the Oven and Prepare Pans
Begin by preheating your oven to 350°F (175°C). While it warms up, grease and flour two 9-inch round cake pans to ensure your cake releases easily once baked. This simple step will help achieve perfectly shaped layers, making your Spiderweb Chocolate Cake easy to handle.
Step 2: Combine Dry Ingredients
In a large mixing bowl, sift together 2 cups of all-purpose flour, 3/4 cup of unsweetened cocoa powder, 1 1/2 teaspoons of baking powder, 1/2 teaspoon of baking soda, and 1/2 teaspoon of salt. Whisk these ingredients to ensure they are well mixed, which contributes to a consistent rise in your chocolate cake and enhances the overall flavor.
Step 3: Mix Wet Ingredients
In another bowl, whisk together 1 1/2 cups of granulated sugar, 3 large eggs, 1 cup of buttermilk, 1/2 cup of vegetable oil, and 2 teaspoons of vanilla extract. Mix until smooth and creamy, creating a luscious base for your Spiderweb Chocolate Cake. The mixture should have a light, fluffy texture that’s inviting and rich.
Step 4: Combine Wet and Dry Mixtures
Gradually add the dry ingredient mixture to the wet ingredients, stirring gently until just combined. Be careful not to overmix; a few lumps are okay. The batter will be thick and chocolatey, filled with anticipation for the baking magic ahead as you soon watch it transform into layers of deliciousness.
Step 5: Bake the Cake
Pour the batter evenly into the prepared cake pans. Place them in the preheated oven and bake for 30-35 minutes, or until a toothpick inserted into the center comes out clean. Keep an eye on the cakes; they should rise beautifully and create a slight dome, showcasing their rich chocolate goodness.
Step 6: Cool the Cakes
Once baked, remove the cakes from the oven and let them cool in the pans for about 10 minutes. Carefully transfer them to a wire rack to cool completely. Cooling them properly ensures your Spiderweb Chocolate Cake is sturdy enough to hold the intricate chocolate decoration you’ll create later.
Step 7: Melt Chocolate for Decoration
While the cakes are cooling, melt 4 ounces of dark chocolate in a microwave-safe bowl in 20-second increments, stirring in between. Once melted and smooth, allow it to cool slightly, making it easier to pipe the spiderweb decoration onto your cake without it running.
Step 8: Create the Spiderweb Design
After the cakes have cooled completely, place one layer on a serving plate. Using a piping bag or a zip-top bag with a corner snipped off, carefully pipe the melted chocolate onto the top of the cake in a spiderweb pattern. Chill the decorated cake until the chocolate is set, giving your Spiderweb Chocolate Cake a stunning finish.
Make Ahead Options
These Festive Spiderweb Chocolate Cake preparations are perfect for busy weeknights or holiday gatherings! You can bake the chocolate cake layers up to 3 days in advance; just cool them completely and wrap them tightly in plastic wrap before refrigerating to maintain moisture. The spiderweb decoration can be made ahead too; simply pipe the melted chocolate onto the cooled cakes, and store them in the fridge for up to 24 hours. When you’re ready to serve, allow the cake to come to room temperature for the best flavor, and enjoy the deliciousness without the last-minute hassle. This way, your cake will be just as stunning and scrumptious as if you made it fresh!
What to Serve with Spiderweb Chocolate Cake
As the warmth of chocolate fills the air, let’s create a festive feast that perfectly complements this whimsical dessert.
- Whipped Cream: A dollop of freshly whipped cream adds a light, airy texture that balances the cake’s richness beautifully.
- Vanilla Ice Cream: The creamy coolness of vanilla ice cream contrasts wonderfully with the warm, chocolatey goodness. Slice and serve for a delightful indulgence!
- Caramel Sauce: Drizzling caramel sauce over the cake enhances the flavors without overpowering the chocolate—a sweet, sticky treat that’s hard to resist.
- Pumpkin Spice Latte: Serve this seasonal drink alongside for a cozy pairing that captures the essence of fall in every sip.
- Fresh Berries: Raspberries or strawberries add a pop of color and a tart freshness that cuts through the richness of the cake, creating a delightful harmony.
- Chocolate Milkshake: A tasty, nostalgic pairing that brings back childhood memories, this drink is just as exciting as a slice of cake!
- Spicy Hot Chocolate: Warm spiced hot chocolate embraces the chocolate theme and adds a cozy touch to your Halloween celebration.
- S’mores Dip: For a playfully sweet side, this dip brings classic flavors together, inviting guests to indulge in another chocolate treat!
- Pumpkin Whoopie Pies: These festive desserts are perfect for Halloween gatherings, offering a delightful texture and flavors that complement the cake’s richness perfectly.
- Apple Cider: A warm glass of spiced apple cider welcomes fall flavors and creates a comforting drink option for your gathering.
How to Store and Freeze Spiderweb Chocolate Cake
Room Temperature: Keep your Spiderweb Chocolate Cake in an airtight container at room temperature for up to 3 days to maintain its moistness and flavor.
Fridge: If you want to extend its life, store the cake in the fridge for up to 5 days. Just be sure to wrap it well to prevent it from drying out.
Freezer: For longer storage, freeze the cake wrapped tightly in plastic wrap for up to 3 months. Thaw in the fridge overnight before serving.
Reheating: To enjoy leftovers, gently reheat slices in the microwave for 10-15 seconds, or set them out at room temperature to soften before serving.
Variations & Substitutions for Spiderweb Chocolate Cake
Customize your Spiderweb Chocolate Cake to suit your taste and celebration needs with these enticing variations. Each option invites you to explore new flavors and textures that will delight every palate.
- Vegan Option: Substitute eggs with flax eggs and use plant-based milk and oil for a delicious vegan cake without sacrificing flavor.
- Gluten-Free: Swap all-purpose flour with a gluten-free blend to ensure everyone can enjoy this festive dessert.
- Rich Flavor Boost: Incorporate a tablespoon of espresso powder into the batter for a deeper, more complex chocolate flavor.
- Colorful Web: Use pastel-colored chocolate melts instead of dark chocolate for a vibrant twist, perfect for baby showers or springtime events.
- Extra Crunch: Fold in some chopped nuts like walnuts or pecans into the batter to add texture and a nutty flavor that complements the chocolate.
- Decadent Filling: Layer the cake with a fluffy whipped cream cheese frosting or Sugar Cookie Cheesecake for an added creamy surprise between the layers.
- Spooky Decoration: Get creative with Halloween-themed sprinkles or edible glitter on top of the spiderweb to make your cake stand out.
- Heat it Up: Add a pinch of cayenne pepper or chili powder to the batter for a subtle spicy kick that pairs intriguingly with the chocolate.
Embrace the spirit of creativity and flavor as you make this Spiderweb Chocolate Cake your own! 🌟 Feel free to explore other delightful recipes like my Apple Crumble Cheesecake or indulge in some simple yet satisfying Chocolate Oat Cookies for more family-loved treats!
Expert Tips for Spiderweb Chocolate Cake
Perfect Temperature: Ensure all ingredients are at room temperature for an even mixture, which promotes a well-risen and fluffy cake.
Don’t Overmix: Gently combine wet and dry ingredients to avoid a dense cake. Remember, a few lumps are perfectly fine!
Toothpick Test: Check for doneness by inserting a toothpick in the center; it should come out clean or with a few moist crumbs, not wet batter.
Cool Completely: Allow cakes to cool completely before decorating to prevent the chocolate from melting, ensuring a beautiful spiderweb design.
Brighten It Up: Consider using colored chocolate melts for a fun twist on the spiderweb design, making your festive dessert truly pop!
Enjoy crafting this delicious Spiderweb Chocolate Cake and make every slice a delight for your Halloween gatherings!

Spiderweb Chocolate Cake Recipe FAQs
What is the best way to select ripe ingredients for this cake?
Absolutely! When it comes to choosing your ingredients, opt for fresh eggs and buttermilk that aren’t near their expiration date. For the cocoa powder, make sure it’s fresh as well—if it has a faded box or a dull smell, it’s time to get a new one. Using high-quality cocoa can really transform the chocolate flavor of your cake!
How should I store leftover Spiderweb Chocolate Cake?
To keep your Spiderweb Chocolate Cake fresh, store it in an airtight container at room temperature for up to 3 days. If you need it to last longer, wrap it securely in plastic wrap and place it in the fridge, where it can stay good for up to 5 days. Just remember, if you choose the fridge option, make sure to let it sit out for a bit before serving to bring back its delicious texture.
Can I freeze my Spiderweb Chocolate Cake?
Absolutely! This cake freezes beautifully. Just wrap the cooled cake layers tightly in plastic wrap and then in aluminum foil. You can freeze it for up to 3 months. When you’re ready to enjoy it, thaw the cake in the refrigerator overnight or at room temperature for a few hours. This will keep it delicious and moist!
What if my cake sinks in the middle after baking?
Very! A sunken cake can happen for a few reasons. One common reason is opening the oven door too early before the cake has set, which disrupts the temperature. Always check for doneness with a toothpick inserted into the center before pulling it out. If your cake still sinks, try reducing the oven temperature slightly next time and bake a little longer to allow it to rise perfectly.
Are there any dietary considerations I should keep in mind for this cake?
Yes! It’s important to note that this cake contains eggs, dairy, and gluten. If you have a gluten intolerance, you can substitute the all-purpose flour with a gluten-free blend. For a vegan option, consider using flax eggs and almond milk instead of traditional eggs and buttermilk. Just ensure you use dairy-free chocolate for the spiderweb design, and you’ll have a delightful treat that everyone can enjoy!
What’s the best way to achieve the perfect spiderweb design?
Creating that beautiful spiderweb pattern is part of the fun! First, let your chocolate cool slightly after melting—this helps it keep its shape when piped. Use a piping bag or a zip-top bag with a corner snipped off for precision. Start from the center and move outward in circles, then use a toothpick to pull lines from the center to the edges for the web effect. Just remember to chill the cake once decorated until the chocolate is set, and you’ve nailed the festive look!
Caramel Apple Cheesecake Bars You'll Love This Fall
Ingredients
Equipment
Method
- Preheat your oven to 350°F (175°C). Grease a 9-inch square baking pan.
- In a mixing bowl, combine cream cheese and sugar. Beat until smooth, then add eggs and vanilla, mixing until well combined.
- Fold in sour cream until fully incorporated.
- Pour the cheesecake mixture into the prepared baking pan and smooth the top.
- Sprinkle chopped apples over the cheesecake batter.
- Bake for 30-35 minutes until the edges are set and the center is slightly jiggly.
- Let cool for 10 minutes, then drizzle with caramel sauce. Allow to chill in the fridge for an hour before slicing.
Leave a Reply