
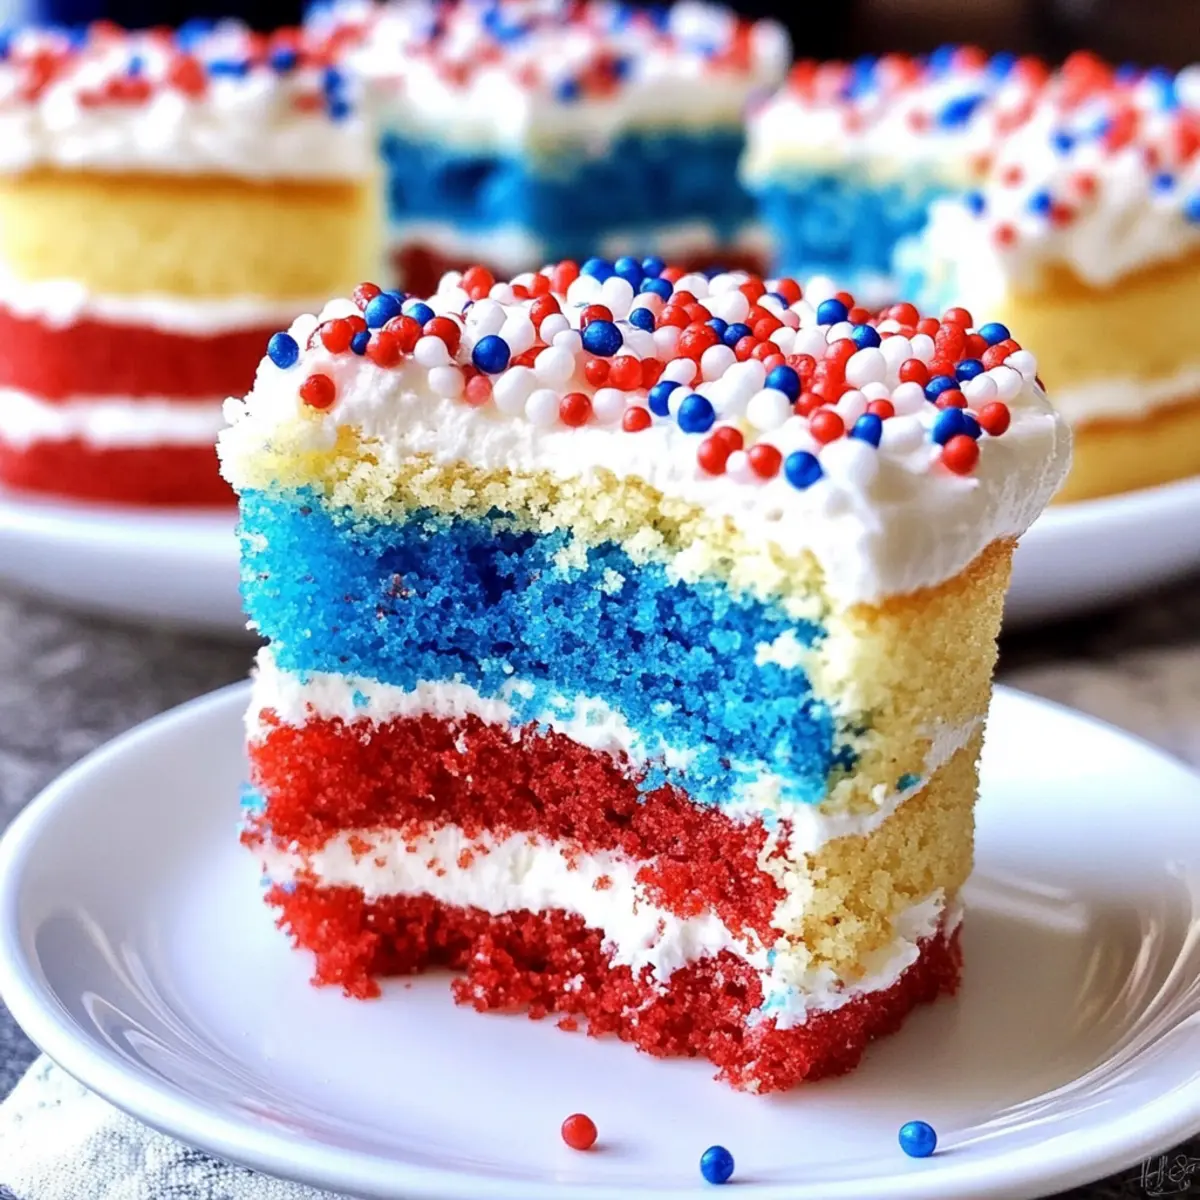
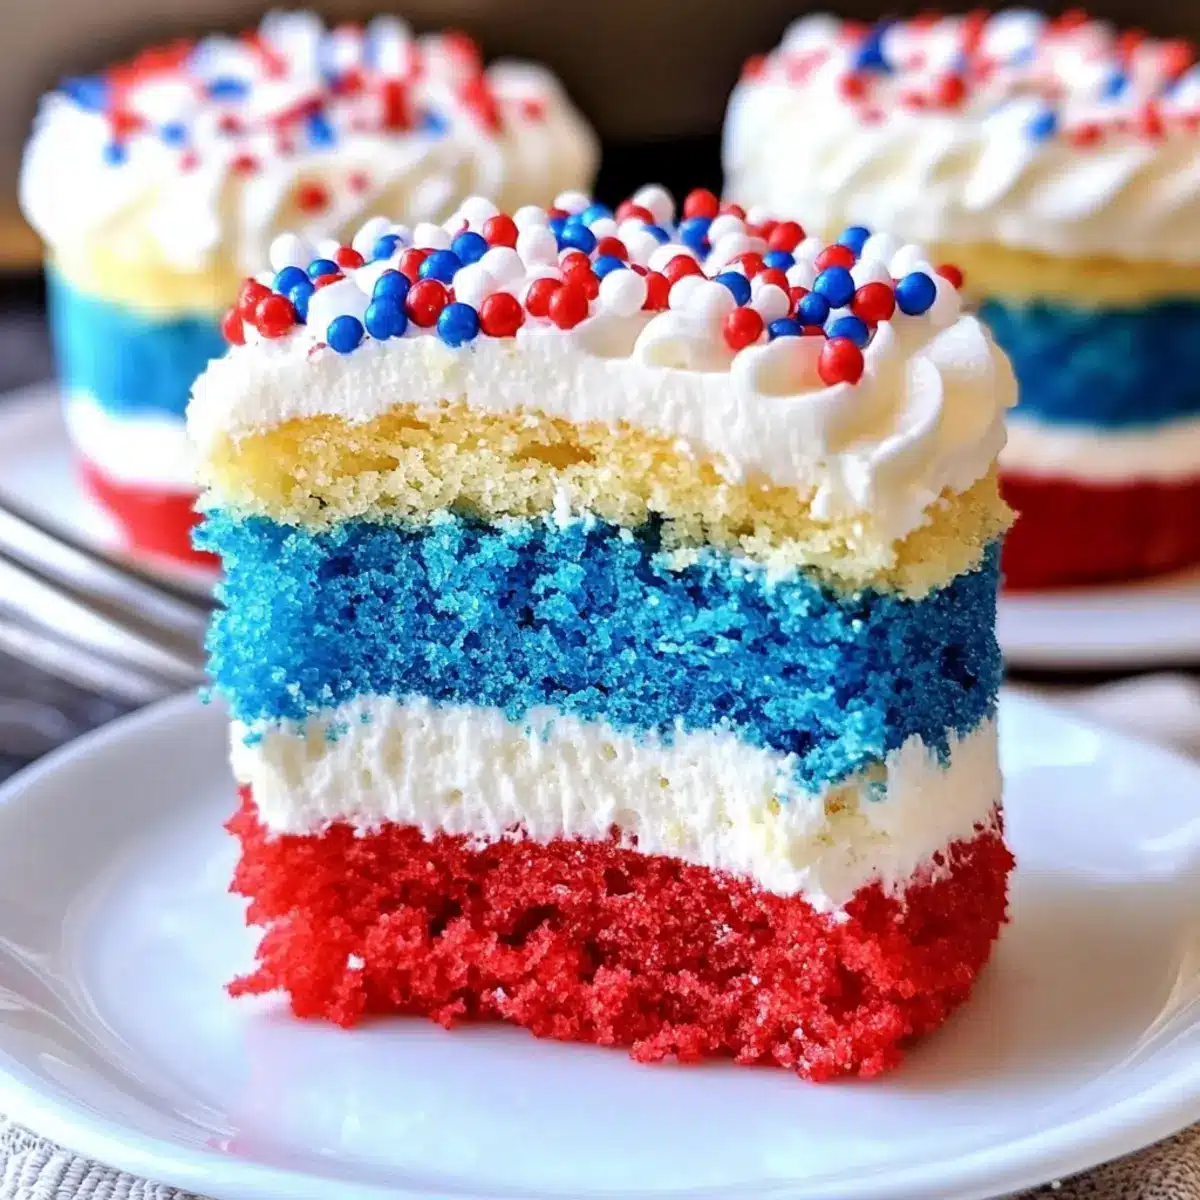
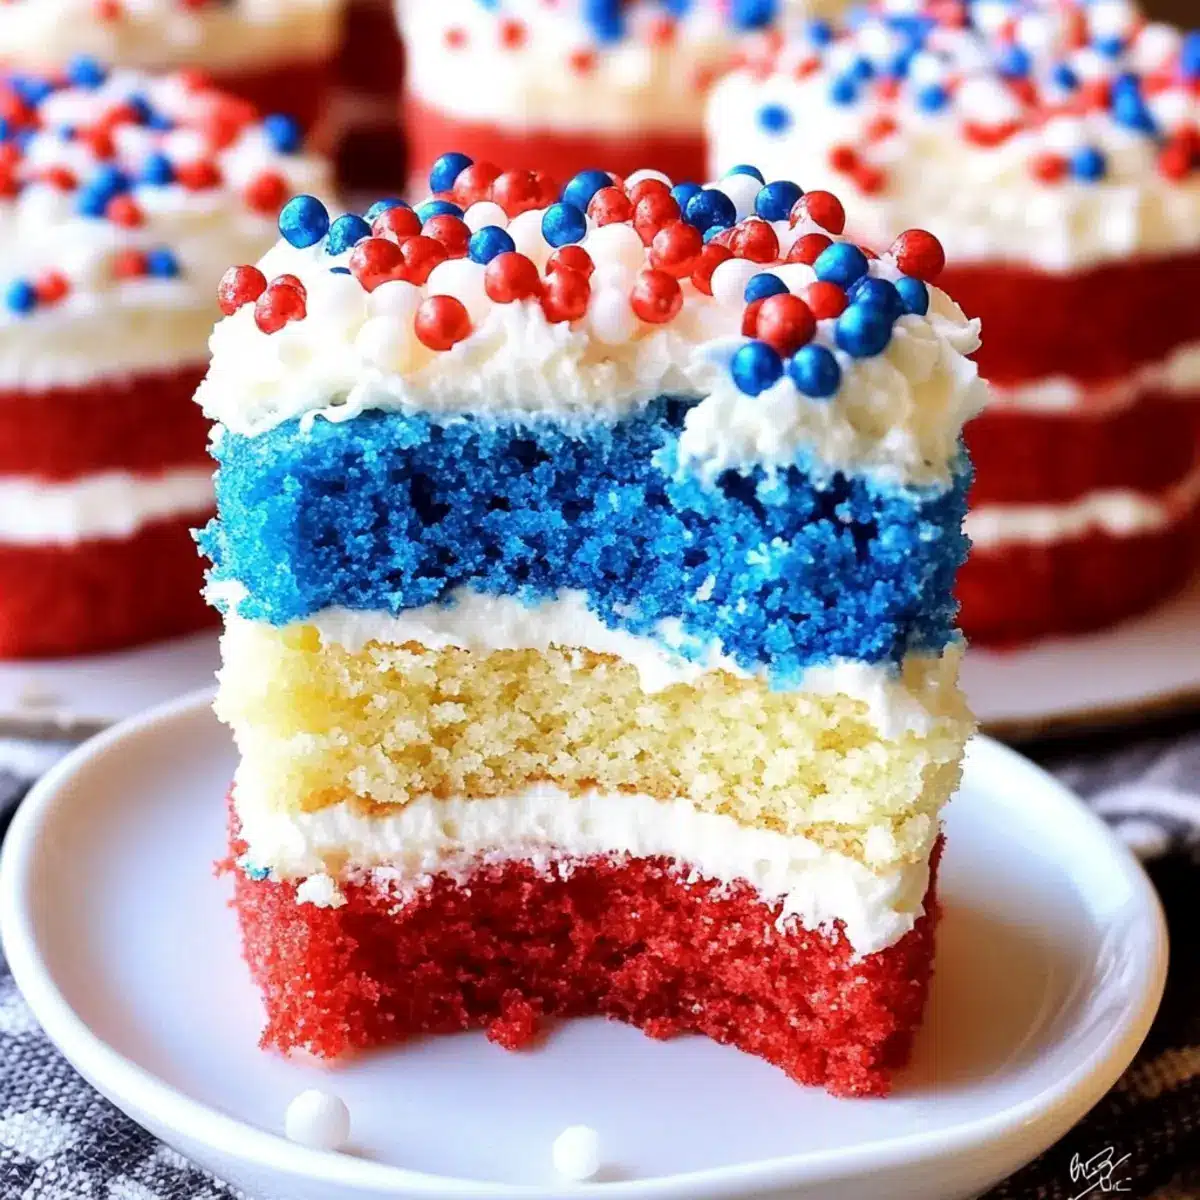
The first bite is like a burst of summer laughter, the kind that makes every gathering feel like a cherished celebration. These Red, White, and Blue Mini Cakes are more than just a dessert; they encapsulate the joy and spirit of American holidays, serving as a vibrant centerpiece for your BBQs and picnics. Made with light, fluffy layers of cake adorned with creamy frosting, they offer an easy yet impressive way to impress your guests. Not only are they a simple dessert to whip up, but their mini size makes them perfect for sharing (or savoring solo!). Whether it’s Memorial Day, the Fourth of July, or Labor Day, these cakes are a delicious way to add color and fun to any occasion. Ready to dive into a festive baking adventure? Let’s get started!

Why are these mini cakes so special?
Vibrant colors make these cakes a stunning addition to any summer celebration, instantly catching the eye of your guests. Customizable for various occasions, their festive spirit can shine through all year round! Quick and easy to prepare, they require just basic baking skills, which means you have more time to enjoy your gatherings. Decadent frosting enhances each fluffy layer, creating a delicious treat everyone will love. You can even make them ahead of time—just assemble and frost before serving for maximum freshness. If you enjoy fun, easy desserts, you’ll find these Mac Cheese Meatloaf cakes are a perfect complement to any meal!
Red, White, and Blue Mini Cakes Ingredients
Gather these festive essentials to create your vibrant dessert!
For the Cake
- Nonstick Spray – Ensures your mini cakes release effortlessly from the pans.
- Flour – Coats the pans to prevent sticking and ease removal.
- Box of Vanilla Cake Mix – The foundation for your Red, White, and Blue Mini Cakes; use egg whites for a lighter color.
- Red and Blue Food Coloring – Infuses the cake layers with a patriotic touch; opt for Wilton gel for the best results.
For the Frosting
- Containers of Vanilla or White Frosting – Binds the layers together and adds a sweet finish; consider homemade for extra flavor.
For the Decoration
- Red, White, and Blue Sprinkles – Elevate the festive look of your cakes; swap them out for themed sprinkles that suit other occasions!
Step‑by‑Step Instructions for Red, White, and Blue Mini Cakes
Step 1: Preheat and Prepare Pans
Preheat your oven to 350°F (175°C). While the oven warms up, grab three 9-inch cake pans and spray them generously with nonstick spray, then dust them lightly with flour to ensure the Red, White, and Blue Mini Cakes come out easily after baking. This prep step is vital for avoiding any sticking issues.
Step 2: Prepare the Cake Mix
In a large mixing bowl, prepare the vanilla cake mix according to the package instructions. To achieve a pure, white batter, be sure to use only egg whites instead of whole eggs. Mix until the batter is smooth and well combined, ensuring there are no lumps for evenly baked Red, White, and Blue Mini Cakes.
Step 3: Divide and Color the Batter
Once your cake batter is ready, divide it evenly into three separate bowls. Add red food coloring to one bowl and blue food coloring to the second, mixing until you achieve vibrant shades. Leave the third bowl uncolored for the white layer of your Red, White, and Blue Mini Cakes. This step ensures each layer has a festive color for your celebration.
Step 4: Bake the Cakes
Pour each colored batter into a prepared cake pan, spreading it evenly with a spatula. Place these pans into your preheated oven and bake for 10-12 minutes, or until a toothpick inserted in the center comes out clean. Keep an eye on them—the mini cakes bake faster than regular sized ones!
Step 5: Cool the Cakes
Once baked, remove the mini cakes from the oven and allow them to cool in the pans for about 5 minutes. Carefully invert each pan onto a wire rack, letting the cakes cool completely. This cooling step is essential before cutting, as it prevents melting and squishing the Red, White, and Blue Mini Cakes when you layer them.
Step 6: Cut Out Mini Layers
After the cakes are completely cool, use a 2.5-inch round cutter to cut out circles from each cake layer. Be sure to discard any scraps to maintain a clean look. You’ll end up with nice, uniform circles that will stack beautifully in the final assembly of your festive treat.
Step 7: Assemble the Mini Cakes
Begin stacking your mini cakes by placing a blue circle at the bottom. Spread a layer of frosting evenly over the blue layer. Next, stack the white cake circle on top, followed by another layer of frosting. Finally, top it off with the red cake circle, creating your Red, White, and Blue Mini Cakes.
Step 8: Frost and Decorate
Using a spatula, apply frosting generously around the sides and top of your stacked mini cakes. Smooth out any excess frosting to achieve a polished finish. For a festive touch, sprinkle red, white, and blue sprinkles over the top, adding a celebratory flair to your delicious creations.
Storage Tips for Red, White, and Blue Mini Cakes
Room Temperature: Keep leftover mini cakes in an airtight container at room temperature for up to 3 days, ensuring they stay fresh and delicious for your next gathering.
Fridge: If using perishable frosting or if the cakes will be around longer, refrigerate them for optimal freshness, consuming within 5 days.
Freezer: For longer storage, wrap the mini cakes in plastic wrap and then in aluminum foil, placing them in the freezer for up to a month. When ready to enjoy, simply thaw in the fridge overnight.
Reheating: To refresh the cakes, allow them to sit at room temperature before serving. If desired, you can microwave individual pieces for 10-15 seconds for a warm treat!
What to Serve with Red, White, and Blue Mini Cakes
Serving these delightful mini cakes opens up a world of festive pairing possibilities, enhancing your summer celebrations with vibrant flavors.
-
Fresh Fruit Salad: The natural sweetness and juicy burst of seasonal fruits offer a refreshing contrast to the creamy cakes.
-
Sparkling Lemonade: The zesty and bubbly beverage beautifully complements the sweetness of the mini cakes, adding a celebratory touch.
-
Grilled Vegetables: Their smoky flavor and vibrant colors provide a savory balance alongside the sweet mini cakes, creating a well-rounded meal.
-
Classic Deviled Eggs: Creamy and subtly tangy, these savory bites provide a delightful contrast to the sweetness of the cakes, making for enjoyable bites.
-
Chocolate Dipped Strawberries: A decadent treat that echoes the red and blue palette while adding an elegant touch to your dessert table.
-
Ice Cream Floats: Pairing vanilla ice cream with soda adds a nostalgic and playful element that enhances the joyful atmosphere of your gathering.
-
Red Velvet Cupcakes: Introduce another layer of dessert with red velvet cupcakes for a rich and moist addition, playing on the patriotic theme.
-
Peach Iced Tea: This refreshing drink marries perfectly with the festive spirit, cooling you down as you indulge in your sweet creations.
-
Mini Cheesecakes: A creamy dessert with a crumbly crust is an elegant way to elevate your dessert spread, perfectly balancing textures.
Red, White, and Blue Mini Cakes Variations
Feel free to have fun and personalize these delightful mini cakes with your own creative twists!
-
Color Customization: Change the color scheme for different holidays, like pastels for Easter or spooky colors for Halloween.
-
Frosting Flavor Swap: Experiment with flavored frostings such as cream cheese or chocolate for a delicious twist that surprises the taste buds.
-
Fruit Layer Addition: Consider adding a layer of fresh strawberries or raspberries between cake layers for a burst of fruity freshness—it’s a delicious surprise!
-
Gluten-Free Version: Swap the vanilla cake mix for a gluten-free cake mix to ensure everyone can enjoy these festive treats.
-
Vegan Substitute: Easily make these cakes vegan by using a plant-based cake mix and substituting eggs with unsweetened applesauce.
-
Spice it Up: Add a pinch of cinnamon or nutmeg to the batter for a warm, cozy flavor that complements the sweetness of the frosting.
-
Nutty Texture: Fold in chopped nuts like walnuts or pistachios into the batter for a delightful crunch that contrasts with the fluffy cake layers.
-
More Sprinkles: Don’t hold back on the sprinkles! Use themed sprinkles that suit the occasion—from unicorns to sports teams, the sky’s the limit!
When you’re inspiring readers to customize their own cakes, it’s just as easy to prepare side dishes like the Broccoli Mein Noodles or serve alongside my sumptuous Mac Cheese Meatloaf. Tailor these recipes to match your mini cakes and behold the joy at your next gathering!
Expert Tips for Red, White, and Blue Mini Cakes
-
Use Egg Whites: To achieve a pure white cake layer, always opt for egg whites instead of whole eggs for your batter.
-
Watch Baking Time: Keep an eye on the oven; mini cakes bake faster than regular cakes. Begin checking for doneness at the 10-minute mark to avoid overbaking.
-
Level Your Cakes: If your cakes dome during baking, level them with a serrated knife before cutting. This ensures flat surfaces for perfect stacking and a professional look.
-
Generous Frosting: Use a generous amount of frosting between layers to enhance flavor and visual appeal. Don’t be shy—it’s all about that creamy goodness!
-
Customize Colors: Feel free to experiment with different colors for various occasions! You can adapt these Red, White, and Blue Mini Cakes for holidays, theme parties, or birthdays.
Make Ahead Options
These Red, White, and Blue Mini Cakes are perfect for meal prep, allowing you to enjoy more time with loved ones during celebrations! You can bake and cut the cake layers up to 24 hours in advance; just ensure they cool completely before storing them in an airtight container to maintain their light texture and prevent dryness. The frosting can also be prepared ahead of time; store it in the refrigerator for up to 3 days. When you’re ready to serve, simply stack the layers with frosting and decorate with sprinkles for that festive touch. This way, you’ll have your delicious Red, White, and Blue Mini Cakes ready with minimal effort on the day of your gathering!
Red, White, and Blue Mini Cakes Recipe FAQs
How do I select the best food coloring for my mini cakes?
Absolutely! I recommend using gel food coloring, like Wilton, for the brightest, most vibrant colors that won’t alter your cake’s moisture. If you choose liquid food coloring, you may need to use more to achieve a similar effect, which can affect the batter’s consistency.
What is the best way to store leftover mini cakes?
Store leftover Red, White, and Blue Mini Cakes in an airtight container at room temperature for up to 3 days. If you have used perishable frosting, it’s best to refrigerate them. To enjoy them beyond that, store in the fridge for up to 5 days or freeze wrapped in plastic wrap and aluminum foil for up to a month.
Can I freeze my mini cakes for later?
Yes, you can freeze the mini cakes! Just follow these steps:
- Allow the mini cakes to cool completely.
- Wrap each mini cake tightly in plastic wrap.
- Place the wrapped cakes in a zip-top freezer bag or airtight container.
- Freeze for up to 3 months.
When you’re ready to enjoy them, thaw them in the refrigerator overnight before serving.
What should I do if my cakes dome during baking?
Very! If you find your cakes have formed a dome, it’s simple to fix. Just let them cool for about 5 minutes in the pan, then carefully remove them. Use a serrated knife to trim off the dome, creating a flat surface for stacking. This ensures your Red, White, and Blue Mini Cakes will look perfectly layered.
How can I adapt this recipe for dietary restrictions, such as allergies?
You can make these mini cakes accommodating for various dietary restrictions! For gluten-free options, substitute the cake mix with a gluten-free variety. To cater to those who require egg-free desserts, consider using a flaxseed meal or applesauce as an egg replacer in the cake mix. It usually translates to an easy swap of 1 tablespoon ground flaxseed mixed with 2.5 tablespoons water for each egg. Enjoy experimenting while keeping it delightful!
Easy Red, White, and Blue Mini Cakes for Summer Fun
Ingredients
Equipment
Method
- Preheat your oven to 350°F (175°C). Spray three 9-inch cake pans with nonstick spray and dust lightly with flour.
- In a large mixing bowl, prepare the vanilla cake mix according to package instructions using only egg whites.
- Divide the batter into three bowls. Color one with red food coloring, another with blue, and leave the third uncolored.
- Pour the batter into prepared pans and bake for 10-12 minutes until a toothpick comes out clean.
- Remove the cakes and cool in the pans for 5 minutes, then invert onto a wire rack to cool completely.
- Use a 2.5-inch round cutter to cut circles from each cooled cake layer.
- Stack a blue circle first, frost, then add a white circle, frost again, and finish with a red circle on top.
- Frost the sides and top of the stacked cakes, smoothing out the frosting, and decorate with sprinkles.
Leave a Reply